![]()
![]()
![]()
![]()
![]()
![]()
![]()
![]()
![]()
![]()
![]()
TECHNIQUE IN TAKING THE BIRD PHOTOGRAPH
Now, lets go back to the camera on a tripod set up in front of an OPEN window. You have your bird feeder on either the left or right outside of the window with all entrances to the feeder blocked off except the window side (see Chapter One). The feeder has been filled for the past several days with various kinds of seed including sunflower seeds or possibly some of your own gourmet delicacies. The birds have found your feeder and are frequently visiting it. Your electronic flash is set on automatic and the scale selected is the one for the farthest distance (see Chapter Five). Your camera is focused properly on a spot outside your open window to provide a good depth of field area (see Chapter Two), and you are sitting just inside your window in a soft chair, sipping a lemonade, with the cable release bulb in you hand. You can see the birds sitting in a tree several feet away and will see them as they leave the tree and fly towards the feeder passing into your camera's set depth of field area (see Chapter One and Chapter Two). As the bird enters the depth of field area, you will take the photograph by squeezing the cable shutter release bulb (see Chapter One and Two). This will set off your electronic flash and freeze the bird’s wings (see Chapter Five). Sound simple? Believe me, it works!
It will now be important to develop an artistic technique. The first thing that must be learned is patience. I average one photograph taken for every ten minutes of waiting. If you're quick, one out of three of these photographs will have the bird in the depth of field area and in focus. That's
an average of one good photograph every half-hour. Furthermore, you have not spent thousands of dollars on equipment, or even several hundred dollars. You are not sitting in a hot umbrella tent, but instead in a soft chair watching various birds fly in and out of the view of your camera. All you have to do is take their photograph.
We must also be aware of what appears in the photograph. We definitely DO NOT WANT TO SEE ANY PART OF THE BIRD FEEDER OR THE WINDOW. All we want to show is the bird in flight, in mid air; not landing on a bird feeder. Set your camera so the bird feeder and window are not in the viewfinder, but only the depth of field area comprising the final portion of the bird's flight path to your feeder. You will see the bird leave its resting place in a tree and as it approaches your feeder, flying through the depth of field area, take the photograph. This is also why the bird feeder is to the right or left of the window. We don't want the bird feeder to appear in the photograph.
Not all the birds landing on your feeder will pass through your depth of field area. Some will fly in from the side and others from the ground where seed has fallen from the feeder. HAVE PATIENCE. I have had days where I got an excellent photograph every five minutes and other days when I didn't get any. I do, however, average one good photograph every thirty minutes.
Also, don't hesitate to take a photograph of a bird flying away from your feeder after it has eaten. Birds who arrive at the feeder without passing through your camera's depth of field area will sometimes leave and fly through it back to the tree.
Initially, your flash will frighten away all the birds approaching the feeder. They will go back to the tree or clothesline and wait, not sure what has happened. Shortly they will return again to feed. If the flash goes off every time they approach they will not come back. WAIT FOR
GOOD PHOTOGRAPHS. Give the birds some free eats without taking any photographs, letting them know that they can feed without being frightened away every time they approach.
After a few days, the birds seem to get used to the flash. They begin to land on the feeder and not fly away after the flash fires. This allows you another type of adventure, for you can begin to identify the same birds returning to your feeder. Those that are no longer afraid of the flash are the frequent visitors. I’ve even given some birds names after recognizing the individual markings of my more frequent flying guests. These frequent visitor birds have learned two things: that the flash doesn’t always go off each time they approach the feeder and when the flash does fire, it doesn’t hurt them.
Something else is very important as you gradually develop your bird photography technique: SIT STILL. If you move while a bird is in the feeder you will frighten it away.
Remember, the camera and the electronic flash may appear like unknown animals to the birds, especially when they are on little tripods with legs. I suggested placing small houseplants on a table between you and the camera. This is very important, for as previously mentioned, this foliage seems to give the birds great comfort and security. Sometimes a bird even enters the room, sits on the camera or tripod, and once they even rested on my chair! Sit still! Be quiet! You are in for a new adventure and experience! When a bird flies into the established depth of field area, take the photograph. Other times just enjoy the birds taking pleasure in your gourmet feeder.
Avoid noises such as television sets and radios. Yes, you may sit back and sip lemonade, but you may not watch football or listen to the radio while you are doing it. A starting refrigerator motor, crying baby, door bell, telephone ringing, pager, etc., will frighten the birds away from the feeder and back to the trees.
For new and different photographs I have tacked to the outside of my window a small branch. You can use a small tree branch with red berries, apple blossoms, or something equally nice. The birds will often land on this branch first then hop over to the feeder. Also, they often hop back and forth between the branch and the feeder allowing many interesting photographs. You will have to reposition your camera so you are focused on the branch and just past it. Photographs of birds landing on and taking off from the branch are very beautiful and often spectacular. Such photographs appear as if your camera were in a tree at just the right moment.
You will also be able to photograph many birds sitting on the branch, often two or more birds at once, but be alert! Birds do not share their food very well. Often birds will fight over who is going to get in the feeder first. Either two birds sitting on the branch will start fighting as one of them heads for the feeder or an arriving bird will suddenly be accosted by a bird already feeding. These fights only last for one second, but one second is a long time if you’re ready to trigger your cable release. These brief battles take place in mid air right in front of your camera! Be alert! If you anticipate these skirmishes, you will take spectacular photographs consisting of two or three flying birds. Sparrows are famous for these battles so be ready for them. You’ll be amazed at how the birds will perform giving you many, many unexpected and rare photo opportunities.
Again, remember to allow only the branch, not the window or bird feeder, to appear in your camera's viewfinder. If you can photograph a bird landing on the branch it should look as if it were landing on a tree. Notice what parts of the branch are in your camera's view, and take the photograph when the bird lands on this area.
Don't use artificial flowers or plastic tree branches in
your photograph. Artificial apple blossoms and other plastic tree branches stick out like a sore thumb in your finished photograph. Everyone will be able to tell.
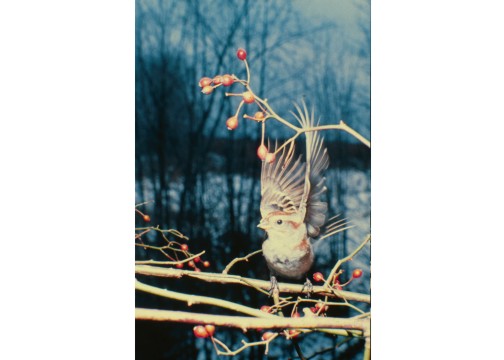
This photograph was taken by a 16-year old boy named Dave Smith. He came to me asking how to photograph birds. I set up the bird feeder, the camera, and the flash. As the above sparrow landed on the branch I had fastened to my window, Dave snapped the above photograph. He then said to me, “Oh, is that all there is to it?” He then left and went home.
Be sure to remove the branch from your window if you again decide to photograph birds flying to the feeder. If you leave the branch in place it will not only block the view of the approaching bird, but being closer to the flash than the bird it will receive much more light and be overexposed in the photograph. To remedy this, either remove the branch from the window or move your flash slightly in front of the branch (on the approaching bird’s side of the branch). See the photo below.
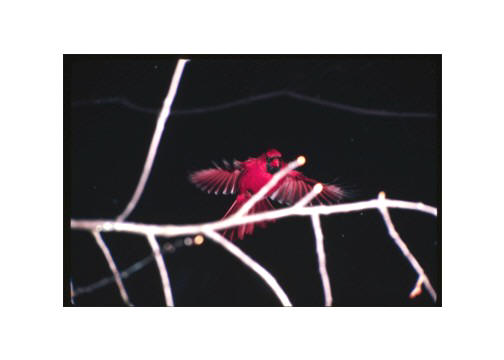
This cardinal would have made a stunning photograph as it made an approach to my birdfeeder. The branch I had fastened to the window was not removed, however, and because the branch was much closer to the electronic flash than the bird, it became over exposed destroying the photograph. Notice the scattered snow flakes in the background. If your flash will stop the action of a bird’s flapping wings, it surely will do the same with falling snow.
One area we haven't discussed is advancing the film in your camera. After you take a photograph you will have to leave your chair and go to the camera to advance the film to the next frame. The reason I mention this is because I have frightened away many birds during this event. Many times, after I took the photograph of the bird approaching the feeder, thus frightening away that bird, another bird arrived not having noticed the flash. If I jumped out of my chair with a bird on the feeder I would certainly frighten this bird away too. It is important to remember that an electronic flash is a rather unusual and frightening experience for a small bird. You want to avoid as much as possible startling away birds from your feeder or the birds may choose another neighborhood feeder where there is less turmoil.
When you rise from your chair to advance the film, do so slowly. A sudden movement may frighten away the birds in the trees or on the clothesline. It will make them suspicious of what might be behind the plants. After all, these houseplants are what gave them comfort and security. You don’t want to make the birds suspicious of them.
It is also very wise not to photograph birds in this manner everyday. Give the birds a day or so to come and go from the feeder without any flash going off at all. This will build their faith in the feeder, and they will continue to feed with minimum alarm.
I often wondered how the film was advanced in a camera placed in a tree where the shutter was triggered by the photographer using a radio signal to snap the photograph. That's easy. Just buy an electric motor wind for your camera. It advances the film automatically every time you snap a picture. Check with your local camera store on availability and pricing.