![]()
![]()
![]()
![]()
![]()
![]()
![]()
![]()
![]()
![]()
![]()
(Extremely useful information for all your photographs. This chapter may blow your mind!)
For those of you who want to go outside to photograph birds, you need to cope with many different sets of photographic conditions. Perhaps you’re thinking of quietly walking near a pond trying to capture the future flight of unsuspecting geese or ducks. You might be thinking about strolling through an open field waiting for a pheasant or some quail to be startled into the air. Quietly drifting in a canoe toward swimming swans or nesting great blue herons offers another photographic opportunity. Peacocks, spoonbills, flamingos, egrets, hawks, eagles, crows, seagulls, pelicans, pheasants, and Canada geese; do you live or vacation near any of these larger birds?
Photographing Large Birds Outside
Photographing roadrunners out west, flamingos in the Everglades, migrating Canada geese, or mallard ducks in flight is going to require more patience and a different photographic technique, but it can be accomplished very successfully. The photographic technique I’m going to discuss is wonderful! It can be used very successfully, not only for sudden bird flights, but also for any photographic experience requiring an immediate photo to be taken without time to focus or set your camera. I believe we call those “Kodak Moments.” If you’re walking next to a pond, and your camera is perfectly set to capture a duck that may suddenly take flight, then your camera would also be perfectly set to capture other spur-of-the-moment photo opportunities. Such occurrences might be the sudden appearance of playing children, running animals (deer, fox, household pets, etc.), special moments at sporting events, or any photo journalism opportunities (police action, fireman rescue, passing celebrity, etc.). But because this is a book about photographing birds in flight, our attention will be focused on our fine feathered friends. It’s important to know, however, that these techniques can be used very successfully in other photographic arenas.
Large birds, like Canada geese, have a much slower wing flapping speed than small birds, such as sparrows. Often your camera’s shutter speed can very sharply freeze the wings of larger birds without an electronic flash; in fact, an electronic flash will probably be useless in this endeavor. In order to use an electronic flash, you must usually be within an average of 40 feet or less from your subject. This depends on your film speed and the power of your flash, but an electronic flash has one drawback – you must be relatively close to your subject. Instead, a fast shutter speed (1/250th, 1/500th) will be used to freeze these larger bird’s wings.
Everything mentioned in Chapter Nine – Exposure, will also apply in this chapter. With that in mind, let’s look again at our ideal exposure.
100 speed film, an f-stop of f/11, a shutter speed of 1/125th.
In order to freeze large bird’s wings, let’s move our shutter speed from 1/125th to 1/500th of a second. This will give us ¼ as much light as the initial shutter speed of 1/125th of a second. Somehow we must now allow 4 times more light to reach our film. I do NOT want to increase my f-stop setting of f/11, because we will need depth of field to focus our camera. Remember, the larger the lens opening, the narrower the depth of field. I will address this focus issue shortly. That leaves us with only film speed to make our adjustment. By changing our film from an ISO speed of 100 to an ISO speed of 400, we have chosen a film 4 times more sensitive to the light, being the equivalent result of increasing our lens opening 2 f-stops. Here we are sacrificing the sharpness of 100 speed film for 400 speed film, but with 400 speed film we will be able to take successful photographs. You’ll find with today’s modern films your photographs taken with high speed films will be quite acceptable, especially if they are not enlarged to sizes greater than 8” x 10.” So, by using 400-speed film, we now again have the same amount of light reaching our film as required in the ideal exposure. Therefore, our camera settings for photographing large birds in the field is ISO 400-speed film, an f-stop of f/11, and a shutter speed of 1/500th of a second.
How Does One Focus on a Flying Bird?
I now again ask an important question that I presented in the beginning of this book: “How does one focus on a flying bird?” That’s a wonderful question, and it is once again answered by our amazing f-stops. Let’s look at typical lens.
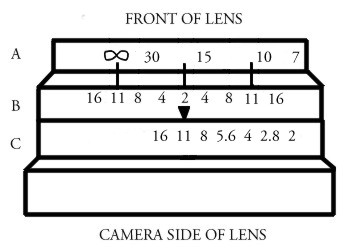
Illustrated above is a typical 50-mm lens for a 35-mm camera. Scale “A” is the distance in feet your subject is from your camera after focusing. In this example I have focused on a subject about 20 feet away (on scale “A” the center line is just left of 15 feet, but farther to the right of 30 feet). Scale “C” indicates the chosen f-stop. In this example I have selected f/11. Scale “B” is your depth-of-field indicator. Please notice the figure “8” lying on its side on scale “A.” This symbol means “infinity,” and that means “forever.” This is very important. Notice this infinity symbol is aligned with the f/11 indication on the left side of scale “B.” Now, look over to the f/11 indication on the right side of scale “B.” Notice that the line is just to the left of 10 feet and far to the right of 15 feet. I would estimate the indicated distance on scale “A” just above the right side f/11 indicator on scale “B” to be 12 feet. What does this mean?
What it means is almost too good to be true!
Any photograph you take with this lens setting, will have the resulting photograph showing everything in focus from 12 feet away to infinity, to forever, to as far as the eye can see! Think about that! We are discussing here a fully manually- operated camera. Yet our exposure is set to be ideal (400 speed film, 1/500th shutter speed, and f/11 lens opening). Our lens has the infinity symbol over our chosen lens opening f/11 resulting in everything being in focus farther away from our camera than 12 feet. Our 1/500th shutter speed will freeze any large bird’s wings. When that mallard duck flies off from the pond, all we need to do is aim and shoot. If the duck is farther away than 12 feet, we have a perfect exposure and frozen wings. AUTOMATIC CAMERAS CAN’T DO THAT!
I know a newspaper
reporter who keeps his camera permanently on our chosen settings. Some
photojournalists even have the focus ring on their lens securely fastened with
masking tape to stay in position. They know they are photographically ready for
anything unexpected and will get a perfectly focused and exposed photograph. A
man jumps from a window in a burning building into a firemen’s net. The
newspaper reporter got the shot. The President of United States darts from a
restaurant doorway into a black limousine waiting by the curb. The newspaper
reporter got the shot. A pheasant flies up from the underbrush 20 feet away as
you are strolling in an open field. You got the shot – all in focus, all action
stopped, all perfectly exposed. As you’re sitting by a lake, ducks or geese fly
in for a landing or take off from the water and fly over your head. You got the
shot, perfectly!
Using This Technique, Items Appear Out of Focus in My Camera’s Viewfinder
Set your lens as described with the infinity
mark over the left side f/11. By the way, your particular lens may have the
infinity mark on the right side instead of the left. If so, you’ll place your
infinity mark over the right side f/11. Now look through your camera’s
viewfinder at an object 20 feet away. It probably will appear out of focus.
“This doesn’t work!” you exclaim, “Roger is nuts!” Yes, I am a little nuts, but
regardless, this technique still works. Here’s why. Let’s look at what happens
to our camera when we take a photograph. As you look through your camera’s
viewfinder, the lens has a lens opening of f/2. You may have your lens set
at f/11, but the lens remains at f/2 until you take the photograph.
Remember, with a SLR (single lens reflex) camera you are actually looking
through the lens when looking into your viewfinder. With a lens opening of f/2,
the opening provides enough light so you can see your subject. If the lens
opening actually went to f/11, the lens opening would be so small that not
enough light would be available for you to see any image. That’s why the lens
opening with a SLR camera stays at f/2 until you take the photograph. Also
remember, a lens opening of f/2 gives you very limited depth of field with very
few near subjects in focus. That’s why items appear out of focus as you look
through your viewfinder. When you push your shutter button, the viewing mirror
raises out of the way of the shutter, the lens shuts down to f/11 giving the
desired depth of field bringing your subjects into focus, and the shutter
opens. When the 1/500th of a second has expired, the shutter closes,
the viewing mirror lowers back into position, and the lens opening returns to
f/2. Truly remarkable!
Using Telephoto Lenses
Photographing large birds outside offers an opportunity to use a telephoto lens. This will make the bird’s image on the film larger. A good size telephoto lens is between 135 mm and 300 mm. Notice your telephoto lens also has an infinity mark and a depth of field scale, so set your lens so the infinity mark is over the f/11. You will also notice that your telephoto lens will not allow your depth of field focus area to start as close to your camera as your 50-mm lens. Remember, we set our 50-mm lens so at f/11 everything would be in focus as close as 12 feet away from our camera and as far away as infinity. With a telephoto lens you will find the depth of field range would be from 30 or 50 feet away from your camera to infinity. This should also work, for it’s difficult to get very close to a wild bird.
Birds of Prey
This telephoto lens technique works well if you live near circling hawks looking for field mice or eagles diving into a lake after fish. If you don’t live in the country, many cities now have peregrine falcons nesting in their skyscrapers. The peregrine falcon has been said to be the fastest bird in the world often diving on its prey at speeds approaching 180 miles per hour. They build their nests among the high gargoyles and other decorative carvings that adorn the architecture of our city’s oldest skyscrapers. What do they feed on in America’s large, concrete, metropolitan playgrounds? Why, pigeons, of course. In some cities the pigeon population has gotten too large and the annoying birds often boldly attack pedestrians carrying groceries.
The peregrine falcons have been welcomed and encouraged by many mayors in an effort to reduce the nuisance pigeon population. I have never photographed these birds of prey in our nation’s cities, but I’ve seen the raptors in action on local news television broadcasts. If the television news reporter can capture a diving peregrine colliding with a pigeon at 180 miles per hour – exploding feathers everywhere -- perhaps you can too. Take this as a challenge. Let me know how successful you are stalking these falcons in our concrete jungles. Perhaps I can learn some new photographic techniques from you!
Oceans, Rivers, and Lakes
A very beautiful, large bird in flight and one very easy to photograph is the sea gull. Anywhere around the Great Lakes or Atlantic, Pacific, or Gulf coast or along our nation’s many rivers you can find sea gulls. Simply walk on the beach or along the edge of any river flowing through our many cities and start throwing bread chunks upward toward the sky. Usually within minutes, multitudes of gulls are hovering above all fighting for position to grab the pieces of bread out of the air. They dive and roll and loop in highly skilled aerobatic maneuvers fighting other gulls for your chunks of bread. This is what is known as a “photo rich environment.”
The gulls are perfect subjects for our outdoor camera settings (400 speed film, 1/500th of a second, f/11). In fact, because the gulls frequently ride the wind, their wings are often motionless. To aid this effect, throw your bread chunks in the direction the wind is blowing forcing the gulls to fly into the wind (toward you) to catch their booty. This will allow them to glide in the wind hovering just above you making it easier for the gulls to catch your offerings and easier for you to photograph them. Under such ideal conditions, a 1/500th of a second is not needed to freeze the gull’s wings, but instead a 1/250th will do the job nicely. This will allow you to go to an ISO film speed of 200 for sharper photographs.
The gulls are also within the range of your flash, for they often fly well within 40 feet from your camera. Therefore, as the sun starts to set and the evening sky fills with purple hues, point your camera with your electronic flash upward at the hovering gulls and take the photograph. The flash will stop the gull’s wings beautifully and will also illuminate the underside of the gulls in contrast against the darkening sapphire sky. The electronic flash will illuminate the underside of the gulls; it will have no effect on the darkening sky. These are very beautiful photographs!
Remember to set your automatic electronic flash on the farthest distance, for the gulls will fly from 10 feet to 40 feet away from your camera. Set the lens with the f-stop indicated by your flash scale for this distance. Set your camera for the proper electronic flash shutter speed, usually 1/60th or 1/125th of a second. Set your infinity mark on your chosen lens opening indicator line (mentioned earlier in this chapter) so most of the gulls will be in focus as you simply aim and shoot one spectacular photograph after another. Most important of all, have someone else throw the bread chunks. You’re going to be busy! Enjoy!
If you have a fully
automatic camera, turn on your flash, aim, and shoot. The only problem you might
encounter with a fully automatic camera is focusing on the gulls. If your
camera sets its focus from sending out an infrared beam and having it return to
the camera from the subject, you will want to keep the gulls centered in your
viewfinder. This beam usually only focuses on subjects located in the center of
your intended photographs. If there is empty space in the center of your
viewfinder, the infrared beam might try to focus on the sky (interesting)
resulting in out of focus sea gulls.
Wildlife Areas
Many birds in our
national and state parks, wildlife areas, and bird sanctuaries are often tame
enough to allow you to get quite close to them, especially if you approach very
slowly. These birds are usually large like geese, flamingos, spoonbills, blue
herons, owls, peacocks, and swans. Here the large size of the birds offers
three advantages in our photography. First, because the bird is so large, you
may not need a telephoto lens. Secondly, you can frequently get close enough to
these large birds to use your electronic flash using the same technique as
discussed above for the sea gulls. Your flash will be effective anywhere from 10
to 40 feet away from the bird depending on the type of flash you have. You must
check the distance within which your flash is effective. If you get within this
distance and the bird has not yet flown away, get ready for a wonderful
photograph. Take the photograph as the bird flies away. You will be very
impressed. Third, as mentioned before, large birds have much slower wing
flapping speeds than small birds and their wings can be frozen with shutter
speeds as slow as 1/250th to 1/500th of a second. This
allows us to set our camera without using an electronic flash as I described
under the sections “PHOTOGRAPHING LARGE BIRDS OUTSIDE” and “HOW DOES ONE FOCUS
ON A FLYING BIRD” presented earlier in this chapter.
Extending Your Flash Distance for Photographing Birds at Night
Your electronic flash has a more effective range than you might realize. By setting the flash on “manual” operation, your flash will fire at a duration of 1/500th to 1/1000th of a second – fast enough to freeze most large birds’ wings. Below is a sample of the scale on a manual flash.
|
ISO
25 50
100 150
200 250
300 350
400 450 F-STOP 4 5.6 8 11 16
FEET
32 22
16 11
8 |

The above manual, electronic flash scale is the one depicted in Chapter 5. It indicates that for ISO 50 film, a f-stop of f/5.6 should be used at a subject-to-flash distance of 22 feet. If the subject-to-flash distance becomes 16 feet, then you must set your lens to f/8.
Question: how far away will this flash work on manual operation and still give properly exposed photographs? Well, the scale has a maximum indicated distance of 32 feet, but let’s think a minute and apply what you’ve learned thus far. If my f-stop should be f/5.6 at 22 feet with ISO 50 film, what should my f-stop be with ISO 100 film at 22 feet? By going to ISO 100 film, you doubled the light sensitivity of the film, so you should cut the light in half by going to f/8 to compensate. Let’s do this again, go to ISO 200 film, and then reduce your f-stop to f/11 to compensate. Again, go to ISO 400 film and then set your lens at f/16 to compensate. We are now 22 feet away from our subject at ISO 400 film with an f-stop of f/16. Now let’s try something new. Walk farther away from your subject up to 32 feet. Whether you know it or not, you just cut the available light from your flash in half, so compensate for this by going from f/16 to f/11, thus doubling the light that can reach your film. Let’s walk farther away, to 45 feet from our subject. We have cut the light from our flash in half again, so set your lens from f/11 to f/8 to compensate for this. Now go to 64 feet, and set your lens at f/5.6; go to 90 feet and to f/4. Let’s keep going to 128 feet and f/2.8, and finally to 180 feet and f/2.
Does this mean I can effectively use my flash with ISO 400-speed film with my lens set at f/2 at a subject-to-flash distance of 180 feet? Yes, that is what it means. And does this also mean that my flash will fire at 1/500th to 1/1000th of a second on the manual setting and freeze the wings of large birds? Yes, that is what it means. Then I could go outside at dusk and photograph flying ducks and Canada geese landing on a pond 180 feet away or go out at night and photograph flying owls and use my electronic flash to both stop their wings and provide sufficient light? Yes, that’s what it means. Furthermore, if your lens went to f/1.4, then your flash would be effective at a subject-to-flash distance of 256 feet. WOW! Food for thought: if you used 800 speed film, how far away could you get from your subject and still use your flash?
If your manual, electronic flash scale could indicate this extended ability of a flash, the scale would look like this.

This electronic flash extended capability is the second best kept secret in photography; the gray card is the first.
Let’s look at our f-stop numbers again. I’ve added some new ones for this example.
1 1.4 2 2.8 4 5.6 8 11 16 22 32 45 64 90
To mathematically get from one f-stop to the next smaller f-stop, you multiply by approximately 1.4. For example: 5.6 x 1.4 @ 8; 8 x 1.4 @ 11; 11 x 1.4 @ 16.
To mathematically get from one f-stop to the next larger f-stop, you multiply by approximately .7. For example: 5.6 x .7 @ 4; 4 x .7 @ 2.8; 2.8 x .7 @ 2.
* @ means approximately equal to
Remember, each f-stop cuts in half or doubles the amount of light from the subsequent f-stop. The same holds true for distances. A flash on manual operation or a flood light 11 feet away from the subject will provide twice as much light if moved 8 feet away or one half as much light if moved 16 feet away from the subject.
A flash on manual operation or a flood light 19 feet away from the subject will provide twice as much light if moved 13.3 feet away (19 x .7 = 13.3) or one half as much light if moved 26.6 feet away from the subject (19 x 1.4 = 26.6).
But F/2 Gives Very Little Depth of Field
Yes, you should be concerned about depth of field, but that is a phenomenon that only occurs with subjects within 50 feet of your camera. With a standard 50-mm lens on a 35-mm camera, everything is in focus 50 feet away from your camera to infinity with ALL f-stops. Depth of field is only a concern with subjects close to the camera (within 50 feet) like cardinals flying to a bird feeder. Therefore, everything you photograph more than 50 feet away with large lens openings will be in focus.
Using an electronic flash at dusk to photograph a flock of flying Canada geese landing on a pond 180 feet away from you would result in a beautiful picture. Using an electronic flash at night to photograph one owl flying along the edge of a forest would result in a very small owl somewhere in your finished photograph. The owl would be properly exposed, but it would appear very small if photographed with a 50-mm lens. A telephoto lens would be necessary to enlarge the owl to a satisfactory size on the finished photograph, but the electronic flash is going to take its light and spread it out over a range wide enough to cover the viewing area of a 50-mm lens.
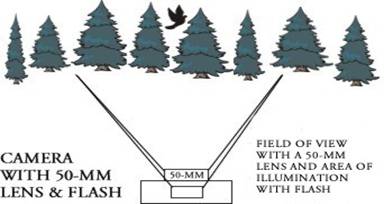
A 50-MM LENS HAS THE SAME FIELD OF VIEW AS THE AREA AN ELECTRONIC FLASH DISPERSES ITS LIGHT
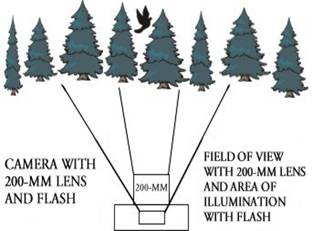
A 200-MM TELEPHOTO LENS HAS A NARROWER FIELD OF VIEW THAN THE 50-MM LENS
The smaller viewing area of a telephoto lens will not receive the full intensity of the electronic flash, only a portion of it. In such a case, an electronic flash with a telephoto disbursement filter is necessary. This is a plastic filter that fits in front of your flash to concentrate the light on a smaller area, like the smaller viewing area covered by a telephoto lens. In this case, when the flash fires, it sends out a more concentrated and narrower beam of light.
Check your local camera store for these items.
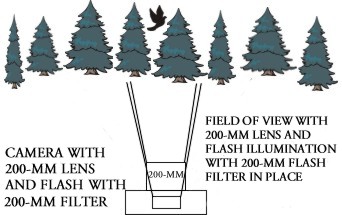
A 200-MM LENS HAS ABOUT THE SAME FIELD OF VIEW AS THE LIGHT CONCENTRATION AREA OF AN ELECTRONIC FLASH EQUIPPED WITH A 200-MM FLASH FILTER
Photographing Small Birds Outside
When you photographed birds flying to your window feeder, you were in your home environment. Once you go outside into the fields, you will be in the birds’ environment. You can cause a great deal of damage to the birds if you are unaware of the effects of your actions. For example, if you are approaching a bird's nest containing baby birds, your presence, if too close to the nest to suit the mother, could prevent the mother bird from returning to the nest until you leave the area. This could result in the death of the baby birds from exposure, especially from the sun. The mother bird serves many purposes other than just bringing food.
Often bird photographers look for bird's nests because the parent birds are constantly flying to and from the nest. Because the parent birds will be flying to the nest every few minutes, the photographer has but a short time to set up the camera. The photographer then waits for the predicted arrival or departure of the parent bird and takes the photograph.
Again I will mention that this type of bird photography is made much easier with the purchase of radio controlled shutter release mechanisms, expensive telephoto lenses, and motor wind devices for automatically advancing the film. I have nothing against these items other than the average person cannot afford to buy them. There are many good books on the market that illustrate the technique of using these expensive accessories. The intention of this book, however, is for the reader to be able to take professional quality bird photographs using standard cameras with a few inexpensive accessories, so let's get started photographing smaller birds outside.
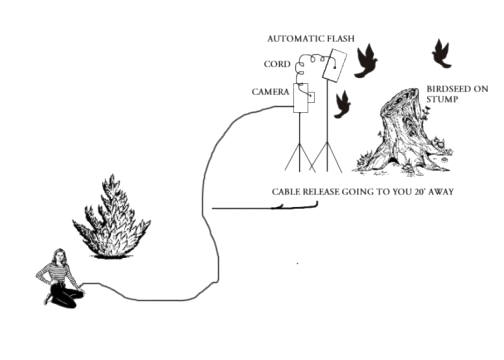
The first technique is similar to the window feeder. Simply place some birdseed on a stump in the woods or in a field. Set up your camera and flash the same as you did inside. As with your window bird feeder, you may wait several hours for your birdseed to be noticed. You can always go away for a while to take a hike or nap for a couple hours giving the birds time to find the seed. Once the seed is discovered, birds will be approaching from all around and above the feeding area, but rarely in the flight path where your camera is focused. Remember in your home with your window feeder, the birds would frequently approach through the depth of field area set up with our camera. To take outside photographs, I suggest you move your camera about 10 feet away from the stump to take in a wider area in your viewfinder. This will not only increase your depth of field, but also allow you to more easily photograph the birds as they approach the stump from different directions. You will also find that in the fields you should extend your cable release from 10 feet to around 20 feet. This will allow your camera to increase its distance from the birdseed (the greater distance your camera is from your subject, the greater the depth of field) and possibly allow you to take some cover. Birds might not approach your outside feeder if you are visible and close to the feeder. Bring a folding deck chair or a blanket with you. Set up the chair or blanket 20 feet away from the stump behind a bush. Then sit still and wait. You should get some spectacular photographs using this method, but unless you have a motor wind on your camera, you will need to go to the camera to advance the film after you take each photograph.
![]()
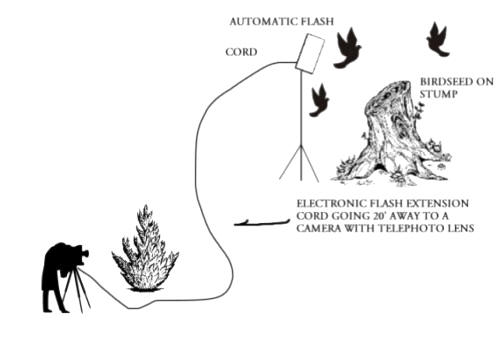
Would it not be easier to photograph these birds if you could aim the camera to where they are approaching or departing? By holding the camera in your hand or on a tripod, a 20 ‘cable release is not needed. You must have your flash next to the tree stump. You can have your camera at any distance from the birds! Using this method will require a telephoto lens in order to get a large enough photograph of the bird and a 20’ extension cord from your flash back to the camera. Also with this method, you can advance your film and get ready for the next photograph because you are holding your camera in your hand. When the camera and flash were near the stump, you had to leave your place of hiding and advance the film after each photograph unless your camera had a motor wind to forward the film. Caution: as you move your camera with its telephoto lens to different areas around the stump, make sure you do not get the electronic flash in your photograph.
Other Things Outside
While you are outside photographing birds, you might want to try some other experiments using the electronic flash to replace very fast shutter speeds. You will find the photographic techniques presented in this book will work equally well on flowers, chipmunks, pets, insects, and other forms of wildlife. Try capturing bees or butterflies landing on flowers. You are restricted only by the limits of your imagination. With these photographic techniques firmly in hand and serendipity resting on your shoulder, there’s no limit to what you might successfully photograph.

SITUATION 1:
My photographs are too dark. My camera does not have any f-stops so I can't increase the lens opening. I can't get my camera any closer to the birds because if I do the birds will not be in focus. What can I do?
ANSWER:
Take your flash off the camera and move it closer to the bird. First you must measure how far away the flash was from your bird when your “too dark” photo was taken. Let’s say it was 22 inches away. Move the flash to 16 inches away to double the light. Move the flash to 11 inches away to quadruple the light. Where am I getting these numbers? Why your f-stops, of course, as discussed in Chapter Nine. Does not each f-stop double or cut in half the amount of light received on the film? Well, these distances in feet (4 feet, 5.6 feet, 8 feet, 11 feet, 16 feet, 22 feet) behave the same way.
You may need to add an extra flash extension cord, but you will receive enough light if you move the flash closer to the bird even if you can't move the camera closer.
You may also use a faster film. If you would like your photographs twice as bright, double the film speed (100 speed to 200 speed); 4 times as bright, quadruple the film speed (100 speed to 400 speed).
SITUATION 2:
My flash is stopping the wings clearly, but I am still getting the wings blurred in the same photograph. What can I do to get rid of the blurred portion of the wings, but keep the clear frozen portion of the wings?
ANSWER:
The ambient light is recording the wings on the film as well as the flash. See Chapter Four - Shutter Speed section “There are Two Kinds of Light with Each Flash Photograph.” Use a slower film speed or a smaller f-stop or both to eliminate the ambient light. If doing these results in the bird’s wings being frozen, but the photograph is now too dark, move the flash closer to the bird keeping the camera where it is. See “Situation 1” above.
SITUATION 3:
I'm getting tired of photographing sparrows. I want to attract different and more beautiful birds to photograph. What can I do?
ANSWER:
As mentioned in Chapter One, different kinds of food will attract different birds. Also, different seasons of the year will bring various birds in and out of the area. Feeders near wooded areas attract different birds than those by fields or water. Go to a nearby nature preserve. Experiment - remember, your camera set-up is portable. If the birds won't come to you, you can always go to them.
SITUATION 4:
I keep getting the window or the bird feeder in the photograph. How can I get them out?
ANSWER:
Move your camera closer to the window while looking through the viewfinder. When you get to the point where the window no longer shows in the viewfinder, fasten the camera to the tripod at that point. Place your camera and flash on a table or chest of drawers by the window. If you can't move a table or chest of drawers to your window, then place the camera on the windowsill and tape it in place or use a tripod placed on the floor next to the window opening. You can be creative here.
The closer you move your camera to the window, the farther out the window your depth of field area goes. Make mental adjustments to this fact so you snap the photograph when the approaching bird flies through the new depth of field area. See Chapter Two.
By the way, if you carefully read the Introduction, it is time to let you know that I had both mayonnaise and mustard on my salami sandwich.
I wish you luck with your bird flight photography, but I have a sneaky feeling you’re not going to need much luck. I think this book blended with your enthusiasm, your patience, and your passion for photography is all you will need. Stay inquisitive and explore many mysteries.
Good luck,
Roger Cram
The End