(Putting it all together!)
A camera’s shutter, when closed, blocks the light coming through your lens and prevents the light from reaching and exposing the film. It’s like a door that opens and closes or it is like the valve on a faucet. The longer you open the valve, the more water comes through the pipe. The longer your shutter stays open, the more light comes through your lens opening (f-stop) and hits the film. And shutter speeds, just like lens openings, either doubles or cuts in half the amount of light that is allowed to reach your film. Some shutter speeds are listed below, and just as f-stops are really fractions (f/8 = f 1/8th), so are shutter speeds. A shutter speed of 60 means the shutter remains open for 1/60th of a second.
Shutter speeds as may be indicated on your camera.
2 4 8 15 30 60 125 250 500 1000
Actual shutter speeds in time duration.
1/2 1/4 1/8 1/15 1/30 1/60 1/125 1/250 1/500 1/1000
A shutter speed of 1/125th of a second keeps the shutter open twice as long as a shutter speed of 1/250th of a second; therefore, a setting of 1/125th allows twice as much light to reach the film. A shutter speed of 1/60th of a second keeps the shutter open half as long as a shutter speed of 1/30th of a second; therefore, a setting of 1/60th allows one half as much light to reach the film.
Up to this point, I have presented you with how light is managed with f-stops, film speeds, and shutter speeds. Now let’s try some sample problems of light management before we go any farther, just to test your understanding.
I. CHALLENGE
YOUR CAMERA IS SET AS FOLLOWS:
1/60th OF A SECOND SHUTTER SPEED
F/8 LENS OPENING
200 ISO FILM SPEED
You develop a photograph taken under the above conditions. Upon viewing the photo, you decide there was too much light when the photo was taken; in other words, the photograph was “over exposed.” You feel the photograph should have been exposed to half as much light for a properly exposed photograph. If you could take this photograph over, what three things can you do to cut in half the amount of light reaching your film?
ANSWER TO CHALLENGE
(1) CHANGE THE SHUTTER SPEED FROM 1/60th TO
1/125th AND LEAVE EVERYTHING ELSE THE SAME…or
(2) CHANGE THE LENS OPENING FROM F/8 TO
F/11 AND LEAVE EVERYTHING ELSE THE SAME…or
(3) REPLACE THE FILM WITH ONE HAVING AN ISO SPEED OF 100 LEAVING EVERYTHING ELSE THE SAME.
II. LEARNING EXPERIENCE
YOUR CAMERA IS SET AS FOLLOWS:
1/60th OF A SECOND SHUTTER SPEED
F/16 LENS OPENING
80 ISO FILM SPEED
Refer to CHALLENGE 1 above, only this time you have decided your developed photograph needs to be re-taken and exposed to twice as much light. What could you have done in order to double the amount of light recorded on your film?
ANSWER TO LEARNING EXPERIENCE
(1) CHANGE SHUTTER SPEED FROM 1/60th TO 1/30th AND LEAVE EVERYTHING ELSE THE SAME…or
(2) CHANGE THE LENS OPENING FROM f/16 to f/11 AND LEAVE EVERYTHING THE SAME…or
(3) REPLACE THE FILM SO THE NEW FILM HAS AN ISO SPEED OF 160 INSTEAD OF 80 AND LEAVE EVERYTHING ELSE THE SAME.
III. KNOWLEDGE REFRESHER
You are using a film with a speed of 160. You have the shutter speed set at 1/60th of a second and the lens opening set at f/16, the smallest lens opening available on your lens. You develop the photographs and discover that they are all over exposed, that is, too much light. You estimate your photograph would look better if taken with ½ as much light. You would like to set your lens to f/22, but f/16 is as small as it will go. You could set your shutter speed to 1/125th of a second thus cutting the light in half, but you must leave the shutter speed at 1/60th or slower because your camera requires this setting for the electronic flash (discussed later in this chapter). What do you do?
ANSWER TO KNOWLEDGE REFRESHER
Leave your lens at f/16, leave your shutter speed at 1/60th, and use an ISO film speed of 80.
Can you see by changing the film to one of a different speed, the owner of a camera without adjustable f-stops and shutter speeds can still control the amount of light recorded by the film, simply by changing the type of film used. Let’s try a problem using a camera with fixed settings.
IV. CONFIDENCE BUILDING EXERCISE
Your camera has a fixed shutter speed as well as a fixed lens – no adjustable f-stops. You are using color slide film with a speed of 80. You develop your first roll of film, and although the electronic flash has successfully frozen the bird’s wings, the photograph is very dark. What should you do?
ANSWER TO CONFIDENCE BUILDING EXERCISE
Use a film with an ISO speed of 160 (80 X 2 = 160) to double the brightness and a film speed of 200 to create a photograph 2 ½ times brighter (80 X 2 ½ = 200). You will get the same light management results doing this as you would changing an adjustable lens from f/16 to just below f/11, thus an increase of one and one-half stops. Of course, without adjustable f-stops, we cannot control our depth of field as precisely.
V. SELF-ASSURANCE ADVENTURE
You are using a camera without adjustable f-stops or shutter speeds. Your film has an ISO speed of 400. After developing your photographs or after taking a light meter reading, you find there is 4 times too much light. You cannot set the lens to a smaller lens opening because the lens is not adjustable. You cannot set the shutter to a faster speed either for the same reason. What should you do?
ANSWER TO SELF-ASSURANCE ADVENTURE
Use a film with a speed of 100, for it will be 1/4th as sensitive to the light as your ISO 400 speed film.
Most amateur photographers think that in order to stop action you need to use a fast shutter speed. Often this is true; however, the high speeds of a bird’s wing presents us with an interesting challenge. In order to photographically freeze a flying bird’s wing, you will need a shutter speed of at least 1/500th of a second for large birds and, for smaller birds with faster moving wings, a shutter speed of a 1/2,000th of a second would be necessary. Hummingbirds require even faster shutter speeds. Does this present a problem? Yes it does, for such high shutter speeds are beyond the capability of most cameras. But there are alternative methods for photographically freezing fast movement other than depending on high shutter speeds. One of these alternative techniques involves the use of an electronic flash, preferably (although not required) an electronic flash that is detachable from your camera. Most 35-mm cameras only allow a detachable electronic flash to be used with a shutter speed of 1/60th or 1/125th of a second or slower. Look at your shutter speed adjustment control. There may very well be a lightning bolt next to the 1/60th or the 1/125th of a second setting. Possibly one of these settings will be in a different color or have a letter “X” next to it. All these variations indicate the desired shutter speed for an electronic flash.
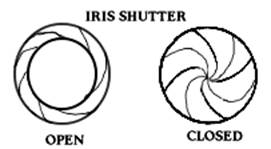
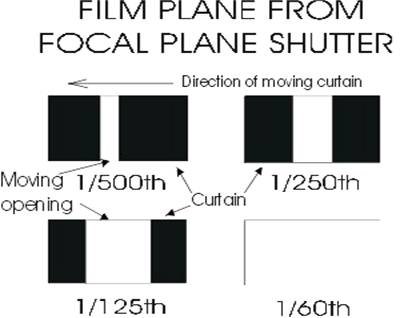
Most cameras, regardless of type or format, operate with one of two different shutter mechanisms – a focal plane shutter or an iris shutter. An iris shutter is usually located in the lens itself. It opens and closes like the iris of your eye and stays open for the time required based on the shutter speed you select. Most 35-mm film cameras have a focal plane shutter. This shutter is not in the lens, but rather located in the back of the camera just in front of the film. This area is called the “focal plane,” thus the name of the shutter. A focal plane shutter acts like a curtain being pulled across your film. The curtain has an opening allowing light to pass, and as this opening zooms across the focal plane it exposes the film. Each shutter speed exposes a different amount of the film as the curtain zooms across the film plane. At higher shutter speeds (1/500th, 1/250th ), only a portion of the film is being exposed to light at any one instant as the opening in the curtain moves across the film. If an electronic flash fired in conjunction with a fast shutter speed, the light from the flash would only expose that portion of the film that the curtain opening was revealing that instant. At slower shutter speeds (1/60th and below), the focal plane shutter exposes the entire frame. Therefore, with slower shutter speeds the entire film plane area is exposed at once, because the opening in the moving curtain at these slower speeds is large enough to do so. When the flash fires, its light exposes the entire frame.
If an iris shutter is more versatile, why is it not used very often in 35-mm cameras? The 35-mm camera, when first introduced, was considered a miniature camera compared to its huge 8” x 10” format and 120 size film brothers. The 35-mm camera was developed for ease of operation, portability, and less cost, especially less cost associated with changing lenses. Present day 35-mm lenses are relatively inexpensive. One reason for this lower cost is each lens does not have to contain an iris shutter, being a rather expensive piece of equipment. By having the shutter inside the camera, wide-angle and telephoto lenses became less expensive, therefore, accessible to more photographers.
If your camera is automatic and it has a built-in electronic flash, then chances are it will also operate at similar shutter speeds when the electronic flash is used. If your camera does not have adjustable shutter speeds, you still do not have a problem. An Instamatic camera usually has a fixed shutter speed of around 1/50th to 1/100th of a second, which is just fine.
Each bird photograph taken with an electronic flash is actually exposed twice. The first exposure comes from the “ambient” light, being the existing sunlight before the flash goes off. The second exposure comes from the electronic flash when it fires. Frequently the sunlight, however, is bright enough to sufficiently expose the bird without the additional light from the electronic flash. This causes a problem, for if the wings are exposed to sufficient ambient light at 1/60th of a second, they will be recorded on the film and they will be blurred because 1/60th of a second is not fast enough to freeze a bird's wings. Therefore, our goal is to not allow the ambient light to record any of the flying bird. We only want the electronic flash to provide enough light to properly record the bird on our film. How can we do this?
Taking A Hypothetical Practice Photograph
In our mind’s eye, we are now going to take a hypothetical photograph of a flying bird. I’m putting you through this exercise to illustrate several important points, so follow along with me using your imagination. To make things simple, set your shutter speed for 1/60th of a second or as close to it as your camera will allow. The rest of your camera settings will be controlled with f-stops and electronic flash.
Let's now create an imaginary flying bird photograph requiring an exposure of f/8, 1/60th of a second, and 200-speed film. We are not going to use an electronic flash just yet. There is sufficient ambient light to take this photograph without the additional light provided by an electronic flash. We all know, however, that a flying bird photographed at 1/60th of a second will have blurred wings, for 1/60th of a second is not a fast enough shutter speed to freeze the wings.
After taking this hypothetical photograph under the above-mentioned settings, we find that our bird is properly exposed but badly blurred, just as suspected. We did not use an electronic flash. This entire hypothetical photograph was exposed only with ambient light. Our goal is to not allow the ambient light to record any of the flying bird. We want only the electronic flash to provide enough light to properly record the bird on our film.
Now that we remember our goal, what can we do to darken our photograph exposed by the ambient light, the light that blurred the wings? To make our photograph exposed to the ambient light darker, let’s set the lens opening from f/8 to f/11. This will darken (under expose) the photograph by one f-stop. But an ambient light reduction of only one f-stop will still expose a bird at 1/60th of a second. It will still blur the wings. It will still be visibly recorded on the film, recorded darker, but still visible. OK, then we want it darker still, so now let’s set the lens from f/11 to f/16. Now our hypothetical photograph is 4 times darker than when it was first taken, but the bird image is still obvious. I suggest we make our photograph even darker again, for two f-stops darker from a properly exposed photo will still allow the ambient light to record an image – a blurred image. What can we do? Well, possibly your lens won’t go any smaller than f/16. If not, what can you do to reduce the recorded ambient light even further? You probably cannot reduce your shutter speed from 1/60th of a second to 1/125th of a second because, as previously discussed, most 35-mm cameras require 1/60th of a second while using electronic flash. How about using a film with a slower ISO speed? We were going to use a film speed of 200; let’s instead use a film speed of 100 thus reducing the light again by a factor of 2. One more time! Let’s replace the ISO film speed of 100 with one of 50. We have now reduced by a factor of 8 the amount of required ambient light to properly expose the flying bird. In review,
f/8 to f/11 cut the ambient light in half, and f/11 to f/16 cut the ambient light in half again. Changing from ISO 200-speed film to ISO 100 cut the light in half once more, and changing from ISO 100 to ISO 50 cut the light in half for a fourth time. This is what we want, to set up our camera so we will end up with a picture so dark from the existing light that we can just barely make out the bird, if at all.
What have we done? We have set our camera so we cannot properly record our flying bird on our film from the ambient light. The resulting picture will be almost completely black. This is good. Now we can use our electronic flash and only record the flying bird when the flash fires. This is also good, for a manual electronic flash has a duration from 1/500th to 1/1000th of a second. This means as the camera shutter remains open for 1/60th of a second recording almost nothing from the ambient light, the electronic flash will fire providing enough light for the photograph for only a 1/500th to a 1/1000th of a second. This will freeze the bird’s wings! Wow! We are using the short duration of the electronic flash to substitute for a very fast shutter speed! Yes we are! In addition, to stimulate your appetite for even more exciting possibilities, I now inform you that an automatic electronic flash has a flash duration as short as a 1/50,000th of a second, and you are able to select that speed. Now you just know we’re going to explore that capability in upcoming chapters!
|
1/1000th OF A SECOND ELECTRONIC FLASH DURING A 1/60th OF A SECOND OPEN SHUTTER |
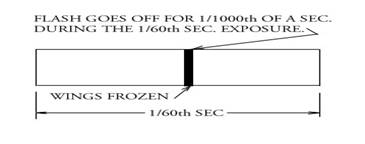
By closing our lens down from f/8 to f/16 and by going from a film speed of 200 to 50, we no longer allow enough ambient light to record the blurring of the wings. There is only enough light for a proper exposure during the 1/1000th of a second that the electronic flash goes off, thus freezing the wings.
Some of you reading this book have enough photographic experience to realize as we reduce our lens openings and lower our film speeds we are indeed reducing the amount of ambient light that can be recorded on our film, but we are also reducing the amount of light from our electronic flash that can be recorded on our film. This is correct. Good thinking; however, this technique will still work. Here’s why.
First, as you will discover in the next few chapters, if you have a detachable electronic flash, you will be shown how to move this flash off your camera and closer to the bird. This greatly increases the intensity of the flash reflected from the bird and corrects for any loss of light resulting from using slow film speeds and small lens openings. Up until now, photographers wanted small lens openings for great depth of field and slow film speeds for clear, sharp photographs as well as fast shutter speeds to stop action, but there wasn’t enough available light to allow photographers such idyllic situations. Now there is. Read on.
What about the camera that does not have any adjustable f-stops on the lens? How does the owner of those cameras control the light? You can only reduce your ISO film speed so far. How can we still reduce the ambient light without an adjustable lens? It can be done effectively by picking a window located on the north side of the house where there is usually the least amount of sunlight. Pick a window with an awning overhanging the bird feeder or a large shade tree nearby, thus casting a shadow and reducing the amount of light. Photograph the birds in the late evening when the
light is less intense or on very cloudy days. Birds will continue to frequent a bird feeder until dark. Believe me, the birds don't mind. They will come to your “gourmet” feeder rain or shine, especially if they have a nearby tree for shelter. With non-adjustable cameras, the best thing to do is to change your film to one with a slower film speed if you have too much light. You may use one type of film for a sunny day and another film for a cloudy day. This will give similar exposure results with your non-adjustable camera as one with adjustable lens openings.
Hopefully you are beginning to realize that having control over your camera’s settings is very valuable. Fully automatic cameras use f-stops, ISO film speeds, shutter speeds, and automatic electronic flash simply to control the amount of light reaching your film. Such cameras often use infrared beams of light to set the camera’s focus; such beams frequently reflect off an object that you do not wish to be the center of focus. The control of your photographs with automatic cameras, the sharpness and fine grain, the depth of field, the enchantment, is often lost. Therefore, if you can operate your camera on a “manual” operation, please do so. Automatic cameras CAN NOT make correct decisions for you.